


A Dripping Tap Is Costing You More Than You Think
To fix dripping tap problems at home, here are the core steps:
- Turn off the water supply at the isolation valve or stopcock under the sink
- Remove the tap handle by popping off the decorative cap and unscrewing the handle screw
- Extract the internal part — washer, O-ring, or cartridge — depending on your tap type
- Replace the worn part with an exact match from a hardware store
- Reassemble and test by slowly turning the water back on
That steady drip in your kitchen or bathroom sink is not just annoying. A faucet that drips once per second can waste more than 3,000 gallons of water a year, enough to fill over 50 bathtubs. That means higher utility bills, unnecessary water waste, and a small leak that can turn into a bigger problem over time.
The good news? Most dripping taps are a simple DIY fix. In many cases, a worn washer, a damaged O-ring, or a failing cartridge is the real problem, and you do not need to be a plumber to get your sink working quietly again.
At Baethke Plumbing in Chicago, we’ve seen how a small, ignored drip can turn into water damage, mold, and expensive repairs. Learning how to fix a dripping tap early is one of the smartest steps a homeowner can take. Read on for a simple, step-by-step guide to getting the leak under control.
The Cost of Delay: Why Fixing Leaks Matters
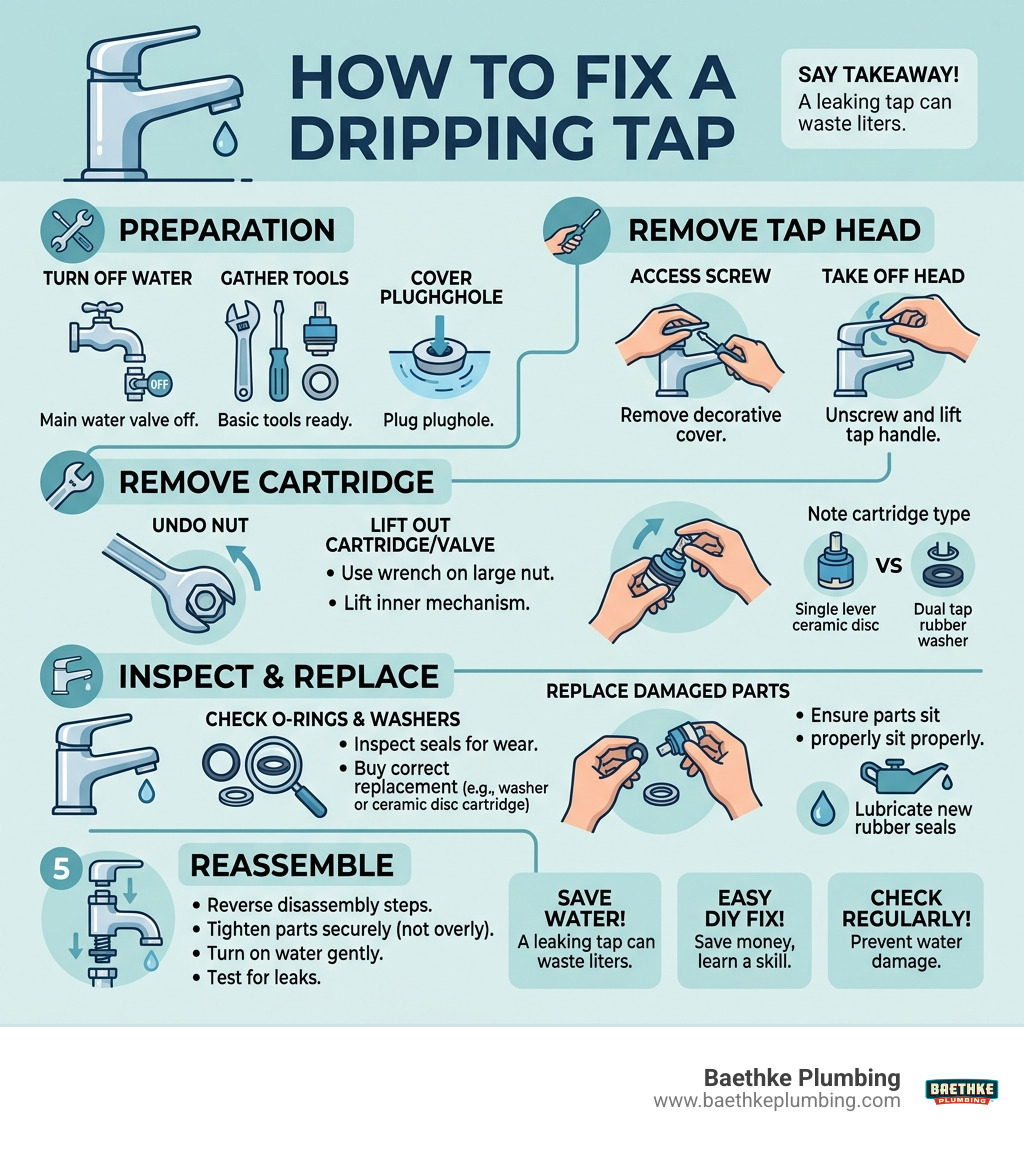
It is easy to tune out the rhythmic plink-plink-plink of a leaky faucet, but that sound is the heartbeat of a growing problem. At Baethke Plumbing, we often see homeowners wait months to address a minor drip, only to find that the moisture has invited unwanted guests into their Chicago homes.
Beyond the sheer volume of wasted water, which the blog “Saving Water by Detecting and Fixing Leaks” explains can add up to thousands of gallons, there is also the risk of property damage. Steady moisture inside a sink cabinet can cause wood rot, warped flooring, and mold or mildew growth. A leak that begins at the spout can spread to the handle or base and may even seep behind tiles or into the wall.
In our local climate, from Lincoln Park to Edison Park, keeping your plumbing tight is essential for maintaining home value. A small investment of time today to fix dripping tap issues prevents a massive headache (and a much larger bill) tomorrow.
Preparation: Tools and Water Shutoff
Before you start taking things apart, you need to be prepared. There is nothing worse than having your sink in pieces only to realize you don’t have the right wrench.
Your DIY Toolkit
To successfully fix dripping tap leaks, gather these essentials:
- Adjustable spanner (wrench): For loosening the packing nut or valve.
- Screwdrivers: Both flat-head and Phillips (cross-head).
- Allen (Hex) keys: Often needed for modern single-lever handles.
- Replacement parts: Washers, O-rings, or a new cartridge (it’s often best to take the old part to the store to match it).
- Lubricant: Plumber’s grease or a bit of WD-40 for stubborn, calcified parts.
- Old towel or rag: To protect the tap’s finish from scratches and to plug the drain.
Safety First: Shutting Off the Water
You must stop the flow of water before you begin. Most modern Chicago homes have an isolation valve located directly under the sink. It usually looks like a small chrome lever or a knurled knob. Turn it clockwise to close it.
If your home doesn’t have individual isolation valves, you’ll need to turn off the main stopcock (the main water shutoff valve for the whole house). Once the water is off, open the tap to drain any remaining water in the pipes. As we mention in The Homeowners Guide to Leak Detection: Five Signs to Look For, ensuring the system is depressurized is a critical safety step.
Identifying Your Tap Type to fix dripping tap
Not all taps are created equal. Knowing which one you have determines how you’ll perform the repair.
- Compression Taps: These are the traditional “twist” taps. You usually have to turn the handle several times to get full flow. They work by compressing a rubber washer against a metal seat. If these drip, the washer is usually the culprit.
- Ceramic Disc Taps: These typically only require a quarter or half-turn to go from off to full blast. Instead of rubber washers, they use two ceramic discs that slide over each other.
- Cartridge Taps: Common in single-lever kitchen mixers. A single internal cartridge controls both temperature and flow.
- Ball Faucets: These have a single handle that moves over a rounded, ball-shaped cap. They are common in older kitchen sinks and contain a complex array of springs and seals.
Step-by-Step Repair Instructions
Before you begin, plug the drain. We have seen many homeowners lose tiny screws down the sink, turning a five-minute fix into a frustrating afternoon. Lay a towel in the basin to catch parts and protect the porcelain or stainless steel. If you find white, crusty buildup on the parts, use a limescale remover or white vinegar to clean them before reassembly. This ensures a better seal and smoother operation, which is a key part of Faucet Repair.
How to fix dripping tap with Compression Valves
- Remove the cap: Pry off the decorative “H” or “C” cap with a flat-head screwdriver.
- Unscrew the handle: Remove the screw hidden underneath and pull the handle off.
- Loosen the valve: Use your adjustable spanner to unscrew the brass valve (the “innards” of the tap). You may need to hold the tap spout steady with your other hand so it doesn’t twist.
- Replace the washer: At the bottom of the valve, you’ll see a rubber washer held in place by a nut or a brass screw. Remove it and pop on a fresh one.
- Check the O-ring: If the leak was coming from the handle rather than the spout, replace the large O-ring on the valve body as well.
- Reassemble: Screw the valve back in, replace the handle, and tighten the screw.
Replacing Cartridges to fix dripping tap
- Access the screw: On single-lever taps, the screw is often hidden behind a small plastic plug under the handle. Use a hex key to loosen it.
- Remove the handle and shroud: Pull the handle up and off, then unscrew the decorative metal shroud (the “collar”).
- Extract the cartridge: Use a wrench to unscrew the large brass nut holding the cartridge in place. Pull the cartridge straight up.
- Align the new cartridge: New cartridges have “lugs” or notches on the bottom. Ensure these line up perfectly with the holes in the tap body.
- Secure and test: Tighten the nut, replace the handle, and test your work. If the tap is still problematic, you might be looking at a full Faucet Replacement.
Maintenance and Professional Intervention
While DIY is great, some situations require a pro. In Chicago, building codes are strict for a reason—they keep your water safe and your home dry.
| Feature | DIY Repair | Professional Service |
|---|---|---|
| Cost | Lower upfront cost for basic parts | Higher upfront cost, but may prevent bigger repair bills |
| Time | Often 30 – 60 minutes or longer for first-time repairs | Usually faster with the right experience and tools |
| Risk | Possible damage to small parts, threads, or seals | Lower risk when handled by a trained plumber |
| Tools | Basic home kit and replacement parts | Specialized plumbing tools and diagnostic equipment |
When to Call Baethke Plumbing
Sometimes a “simple” repair isn’t so simple. You should call us if:
- The parts are seized: If that brass nut won’t budge with reasonable pressure, don’t force it. You could snap the pipe under the sink.
- The “seat” is damaged: If you replace the washer but the tap still drips, the metal “seat” the washer rests on might be corroded or pitted.
- High water pressure: If multiple taps in your home are leaking, your home’s pressure-reducing valve might have failed, causing high pressure to blow out your seals.
- Legal/Code concerns: While minor repairs like washers are fine for homeowners, anything involving the “behind the wall” piping in Chicago should be handled by a licensed pro to ensure it meets local standards.
As we explain in What to Do About Leaking Faucets, preventive maintenance goes a long way. Avoid overtightening your taps. It rarely stops the drip and can crush the washer, which often makes the leak worse.
Frequently Asked Questions about Tap Repair
How much money does a dripping tap waste?
Usually more than most people expect. Even a slow, steady drip can waste a surprising amount of water over time, which can push up your utility bills. If you have more than one leaking tap, the waste adds up fast. Over the course of a year, that small drip can waste thousands of gallons of water.
Can I fix a ceramic disc tap myself?
Yes! While they look more complicated than traditional taps, they are actually easier to fix because you simply swap the entire cartridge rather than fiddling with tiny screws and washers. Just make sure you buy the exact replacement model for your specific brand.
Why is my tap still dripping after changing the washer?
This usually means the “valve seat” is damaged. Over time, the metal where the washer sits can become uneven or corroded. You can buy a “seat dresser” tool to smooth it out, but at that point, many Chicago homeowners find it easier to call a pro or replace the fixture entirely.
Conclusion
Taking the initiative to fix dripping tap issues is a fantastic way to save money and protect your home. Whether you’re in Ravenswood, Logan Square, or over on Cicero Avenue, these simple steps can help you reclaim the peace and quiet of a leak-free home.
However, we know that life gets busy, and sometimes a “simple” plumbing job turns into a complex ordeal. That’s where we come in. At Baethke Plumbing, we’ve spent over 30 years providing the Chicago area with licensed, professional service and straightforward pricing. We take pride in our “customer-first” approach, ensuring that whether it’s a small drip or a major repiping project, the job is done right the first time.
In honor of Fix a Leak Week, we encourage you to inspect all the faucets in your home. If you find a leak that’s beyond your DIY comfort zone, don’t let it wash your hard-earned money away.
Contact our plumbing specialists and schedule your professional faucet repair today with the experts at Baethke Plumbing. We’re ready to help you get your home back in top shape!